Rabu, 11 Mei 2016

VMware vCenter 5.1 Server Installation Step by Step Guide

VMWARE ESXi beginners wonders that what will be next step after installation of ESXi and how to manage it ? To manage vmware ESXi 5.1, you need to connect to VMware vCenter server. Here we will see the installation of vCenter server with step by step screenshots. vCenter 5.1 has lot prerequisite stuffs that you need to do before kicks of the actual vCenter Server installation.
Note:These step is exclusively for VMWARE ESXi 5.1 beginners to practice on their laptop or Desktop using vmware workstation and i had installed without configuring active directory on windows 2008 server.In my case,i have installed windows 2008 server on vmware workstation as guest and will be using this as vCenter server.

Login to windows 2008 server where you want to configure vCenter server.
1.Copy the “VMware vCenter Server 5.1” directory to windows 2008 server and execute the Vmware-vcserver.exe file.You can also start the installation using auto-run file which also available in this directory.
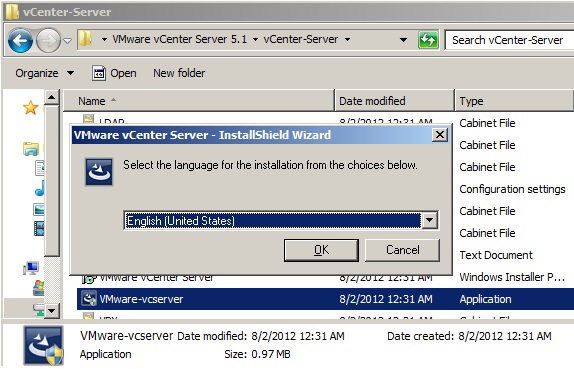
2.Select English and continue the installation.It will install Microsoft visual C++ libraries .


3.After installing the Microsoft Visual C++ libraries ,vmware vCenter server installation will kick off.
4.Click next to continue the installation.


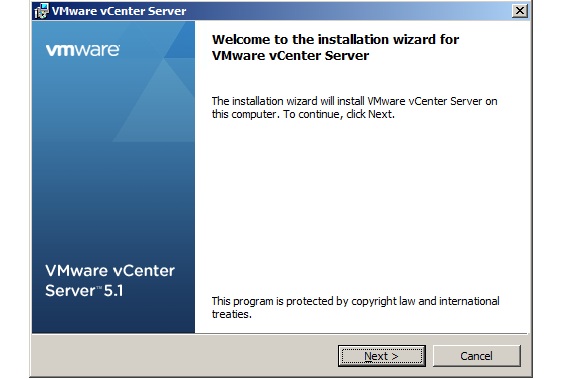
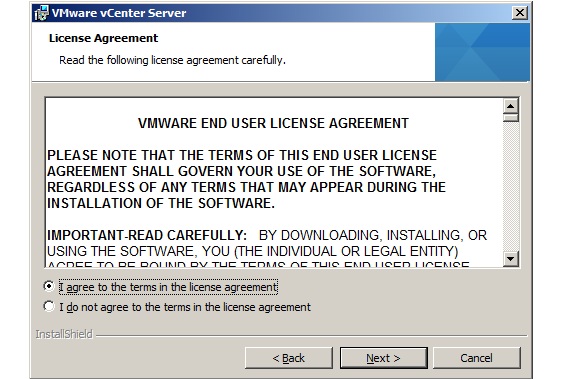
5.Accept the license agreement and continue the installation.
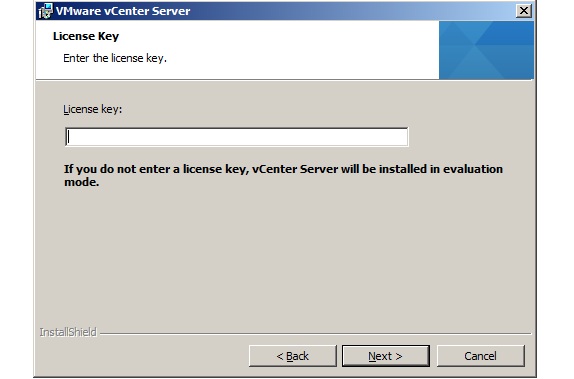
6.If you have valid license key for vCenter server,Just enter it .If you don;t have one just press “Next” to continue.(Evaluation period: 60days).


7. vCenter requires MySQL database to store the vCenter objects data.For smaller deployment ,you can use Microsoft SQL server 2008 express instance like the below screen.For larger deployments ,you need to provide the valid MySQL DSN names.
8.Create a new user account for vCenter server service to run or you can use windows server account by selecting Use SYSTEM Account.
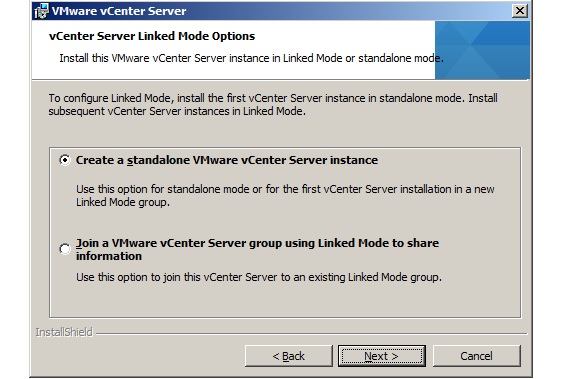
9.If this the first vCenter server in your environment,select standalone Vmware vCenter Server instance.


10.Configure the ports according to your environment.It better to choose the default ports for the vmware services.
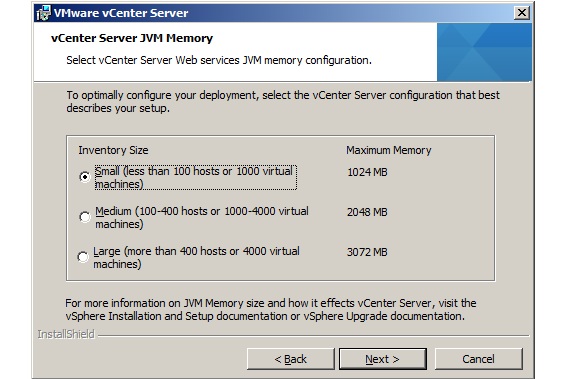
11.Installer will automatically takes JVM memory size according to that Inventory size.Select the the one matching to your environment.
12.Provide vCenter Single Sign On information.
13. vCenter Server user/group name will be register with VMWARE vCenter SSO .Here vCenter Server group name will be Administrators
14.Provide Vmware vCenter Inventory server information and Click Next to continue.


15.You can specify the installation location for vCenter server .
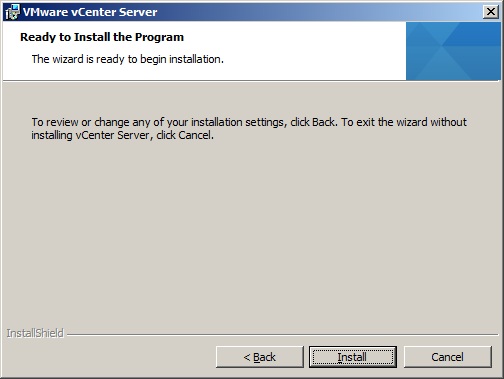
16.That’s it.Just click “install” to install vCenter server now.
17.Click finish to complete the installation of vCenter server.


I was having small trouble while installing vCenter due to system resources and that’s why there was some warning messages on the above screen.If you too get these kind of messages ,just re-run the same installer to install those missing components.

SO what’s Next ? Install VMware vSphere Client and connect to the vCenter Server.
Thank you for reading this article.
And for your detail information:
Reference 1Reference 2Reference 3
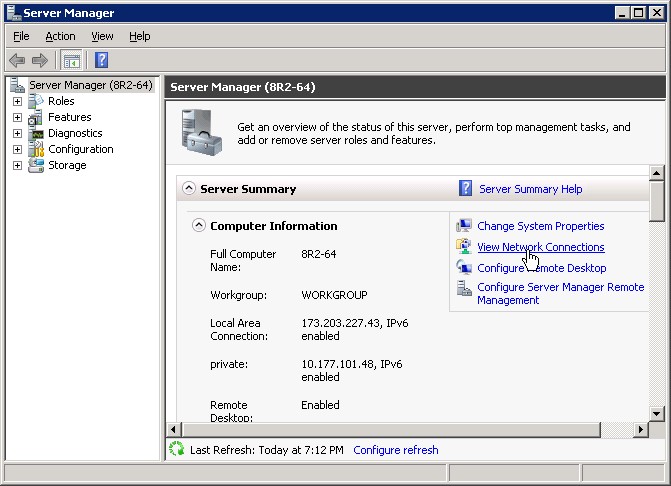
Install Active Directory Domain Services on Windows Server 2008 R2 Enterprise 64-bit

This article provides prerequisites and steps for installing Active Directory Domain Services (AD DS) on Microsoft Windows Server 2008 R2 Enterprise 64-bit (W2K8). This article does not provide instructions for adding a Domain Controller (DC) to an already existing Active Directory Forest Infrastructure.

Prepare for Active Directory

Before you install AD DS on a Rackspace Cloud Server running Windows Server 2008 R2 Enterprise 64-bit (W2K8), you must perform the following prerequisite tasks.

Select Domain Name and Password

Select your domain name and know the domain administrator password that you want to use.
Note: Your domain name should be reliably unique. Do not use the same domain as your website, for example, and avoid extensions like “.local” unless you have registered that domain name in DNS. We suggest a domain name that is not used for anything else, like “internal.example.com”.

Specify the Preferred DNS Server

Windows Server 2008 can properly install and configure DNS during the AD DS installation if it knows that the DNS is local. You can accomplish this by having the private network adapter’s preferred DNS server address point to the already assigned IP address of the same private network adapter, as follows:
  1. From the Windows Start menu, open Administrative Tools > Server Manager.
  2. In the Server Summary section of the Server Manager window, click View Network Connections.
    2K8\_64R2\_ADDS.jpg
  3. In the Network Connections window, right-click the private adapter and select Properties.
    2K8\_64R2\_ADDS(1).jpg
  4. Select Internet Protocol Version 4, and then click Properties.
    2K8\_64R2\_ADDS(7).jpg
  5. Copy the IP address that is displayed in the IP address box and paste it into the Preferred DNS serverbox. Then, click OK.
    2K8\_64R2\_ADDS(2).jpg
  6. Click OK in the Properties dialog box, and close the Network Connections window.
Note: The last step for prepping W2K8 for AD is adding the proper Server Role. The “Active Directory Domain Services”” Role will be added. This only installs the framework for W2K8 to become a DC and run AD. It does not promote the server to DC or install AD.

Add the Active Directory Domain Services Role

Adding the Active Directory Domain Services role installs the framework for Windows Server 2008 to become a DC and run AD DS. It does not promote the server to a DC or install AD DS.
  1. In the Server Manager window, open the Roles directory and in the Roles Summary section, click Add Roles.
    2K8\_64R2\_ADDS(3).jpg
  2. On the Before You Begin page of the Add Roles Wizard, click Next.
  3. On the Select Server Roles page, select the Active Directory Domain Services check box, and then clickNext on this page and on the Confirmation page.
    2K8_64R2_ADDS(4).jpg
  4. On the Installation Progress page, click Install.
    2K8_64R2_ADDS(5).jpg
  5. On the Results page, after the role is successfully added, click Close.
    2K8_64R2_ADDS(6).jpg

Enable the Remote Registry

  1. Open the Server Manager window if it is not already open.
  2. In the Properties area of the Local Servers page, click Remote Managemen.
  3. Select the Enable remote management of this server from other computers check box.

Install Active Directory Domain Services (DCPROMO)

Now that you have prepared the server, you can install AD DS.
Note: As an alternative to performing steps 1 through 3, you can type dcpromo.exe at the command prompt. Then, skip to step 4.
  1. If it is not already open, open the Server Manager window.
  2. Select Roles > Active Directory Domain Services.
  3. In the Summary section,click Run the Active Directory Domain Services Installation Wizard (dcpromo.exe).
    2K8_64R2_ADDS(8).jpg
  4. On the Welcome page of the Active Directory Domain Services Installation Wizard, ensure that the Use advanced mode installation check box is cleared, and then click Next.
    2K8_64R2_ADDS(10).jpg
  5. On the Operating System Capability page, click Next.
    2K8_64R2_ADDS(11).jpg
  6. On the Choose a Deployment Configuration page, select Create a new domain in a new forest and then click Next.
    2K8_64R2_ADDS(12).jpg
  7. On the Name the Forest Root Domain page, enter the domain name that you choose during preparation steps. Then, click Next.
  8. After the installation verifies the NetBIOS name, on the Set Forest Functional Level page, select Windows Server 2008 R2 in the Forest function level list. Then, click Next.
    2K8\_64R2\_ADDS(14).jpg
    The installation examines and verifies your DNS setting.
  9. On the Additional Domain Controller Options page, ensure that the DNS server check box is selected, and then click Next.
    2K8\_64R2\_ADDS(15).jpg
  10. In the message dialog box that appears, click Yes.
    2K8_64R2_ADDS(16).jpg
  11. On the Location for Database, Log Files, and SYSVOL page, accept the default values and then click Next.
    2K8\_64R2\_ADDS(17).jpg
  12. On the Directory Services Restore Mode Administrator Password page, enter the domain administrator password that you chose during the preparation steps. This is not your admin password that was emailed to you during the creation of your server, although you can use that password if you want to. Then, click Next.
    2K8\_64R2\_ADDS(18).jpg
  13. On the Summary page, review your selections and then click Next.
    The installation begins
    2K8\_64R2\_ADDS(19).jpg
  14. If you want the server to restart automatically after the installation is completed, select the Reboot on completion check box
    2K8\_64R2\_ADDS(20).jpg
  15. If you did not select the Reboot on completion check box, click Finish in the wizard. Then, restart the server.
    2K8_64R2_ADDS(21).jpg
  16. After a few minutes, reconnect to your server by using the Console in your Control Panel or RDP.
  17. To log in, perform the following steps: a. Click Switch User, and then click Other User. b. For the user, enter the full domain name that you chose, followed by a back slash and Administrator (for example,Example.com\Administrator). c. Enter the password that was emailed to you when you first built the server. If you changed your password for the local admin account to this server before you began the installation of Active Directory Domain Services, use that password. d. Click the log in button.
The installation of Active Directory Domain Services on your server is complete.
More information: Rack Space

Minggu, 30 September 2012

Kelebihan dan kekurangan harddisk

KELEBIHAN DAN KEKURANGAN HARD DISK:

KELEBIHAN:
- Kapasitas besar
- Pembacaan data lebih cepat.
- Relative tahan lama
- Storage yang cukup aman

KEKURANGAN:
- Harga relative mahal
- Rawan terjadi bad sector
- Bentuk fisik yang relative besar dan berat
- Motor listrik yang memiliki batas usia tertentu, rata-rata 700.000 jam penggunaan.
- Mudah rusak jika terkena benturan fisik.

· KELEBIHAN DAN KEKURANGAN FLASH DISK:

KELEBIHAN :
- Bentuk yang kecil hingga mudah dibawa.
- Harga relative murah.

KEKURANGAN:
- Karena bentuk yang kecil, hingga rawan hilang.
- Removable storage, hingga data rawan rusak.

· KELEBIHAN DAN KEKURANGAN DISKET:

KELEBIHAN:
- Dikenal umum sebagai media penyimpanan pada zamannya
- Dikenal sebagai media portable yang cukup murah pada zamannya.
- Adanya fitur write protection.

KEKURANGAN:
- Kapasitas kecil
- Tranfer data lambat
- Mudah rusak
- Tidak didukung oleh computer modern

Perbedaan Core i3, Core i5 dan Core i7

Intel Core i7
Core i7 sendiri merupakan processor pertama dengan teknologi “Nehalem”. Nehalem menggunakan platform baru yang betul-betul berbeda dengan generasi sebelumnya. Salah satunya adalah mengintegrasikan chipset MCH langsung di processor, bukan motherboard. Nehalem juga mengganti fungsi FSB menjadi QPI (Quick Path Interconnect) yang lebih revolusioner.

Intel Core i5
Jika Bloomfield adalah codename untuk Core i7 maka Lynnfield adalah codename untuk Core i5. Core i5 adalah seri value dari Core i7 yang akan berjalan di socket baru Intel yaitu socket LGA-1156.

Kelebihan Core i5 ini adalah ditanamkannya fungsi chipset Northbridge pada inti processor (dikenal dengan nama MCH pada Motherboard). Maka motherboard Core i5 yang akan menggunakan chipset Intel P55 (dikelas mainstream) ini akan terlihat lowong tanpa kehadiran chipset northbridge. Jika Core i7 menggunakan Triple Channel DDR 3, maka di Core i5 hanya menggunakan Dual Channel DDR 3. Penggunaan dayanya juga diturunkan menjadi 95 Watt. Chipset P55 ini mendukung Triple Graphic Cards (3x) dengan 1×16 PCI-E slot dan 2×8 PCI-E slot. Pada Core i5 cache tetap sama, yaitu 8 MB L3 cache.

Intel juga meluncurkan Clarksfield, yaitu Core i5 versi mobile yang ditujukan untuk notebook. Socket yang akan digunakan adalah mPGA-989 dan membutuhkan daya yang terbilang cukup kecil yaitu sebesar 45-55 Watt.

Intel Core i3
Intel Core i3 merupakan varian paling value dibandingkan dua saudaranya yang lain. Processor ini mengintegrasikan GPU (Graphics Processing Unit) alias Graphics On-board didalam processornya. Kemampuan grafisnya diklaim sama dengan Intel GMA pada chipset G45. Selain itu Core i3 nantinya menggunakan manufaktur hybrid, inti processor dengan 32nm, sedangkan memory controller/graphics menggunakan 45nm. Code produk Core i3 adalah “Arrandale”.

kelebihannya

Intel Hyper Threading : Memberikan user 4-way dan 8-way dalam pemrosesan multitask yang mengijinkan setiap core pada prosessor untuk bekerja pada 2 pekerjaan sekaligus dalam waktu yang bersamaan. ( Pada Core i3, i5 dan i7 ).

Intel Turbo Boost : Meningkatkan performa dengan meningkatkan frekuensi core sesuai dengan permintaan pemakai secara otomatis. ( Core i5 dan i7 ).Contoh : Processor Intel Core i-7 720QM memiliki clock speed sebesar 1.60 GHz untuk minimum. Ketika menjalankan aplikasi yang membutuhkan clock speed yang tinggi. Processor secara otomatis meningkatkan clock speed hingga 2.93 GHz maksimum clock speednya. Dan ketika tidak dibutuhkan maka otomatis clock speed nya akan menurun di angka minimum clock speed. Ibarat Speedometer semakin di gas semakin cepat jalan nya kendaraan.

Intel HD Graphics : Grafik yang sudah high definition. Dibandingkan dengan Intel Graphics pada Core 2 Duo, Pada core-i grafiknya sudah jauh lebih bagus karena sudah HD. ( Pada Core i3, i5 dan i7 ).

Maksimum Memory pada RAM hingga 16GB ( Maksimum memory tergantung dari masing - masing tipe processor ).

Sudah Menggunakan module DDR3 dengan FSB 1066 MHz.
--------------------------------------…
A. Core i3 = Pada core i3 hanya memiliki 2 Core, Hyperthreading ( 4 Way )
B. Core i5 = Pada core i5 memiliki 2 Core, Hyperthreading ( 4 Way ) dan Turbo Boost
C. Core i7 = Pada core i7 memiliki 4 Core, Hyperthreading ( 8 Way ) dan Turbo Boost

Kelebihan dan Kekurangan pada beberapa jenis smartphone

Berikut ini perbandingan Kelebihan dan Kekurangan pada beberapa jenis smartphone dengan menggunakan Operating System Android 2.2, Windows Phone 7, Symbian 3, iOS 4, BlackBerry 6 yang dirilis dari “Chip Online Indonesia”. Mungkin bisa membantu memilah-milih perangkat smartphone apa yang sesuai dan mampu memenuhi kebutuhan anda.

1. Android
Jumlah Aplikasi : 95.154
App Store : Android Market
Kelebihan : Android tergolong sistem yang fleksibel. Pengguna bisa mengombinasikan Apps, Folder, dan Widgets satu sam lain dan mendownload interface lainnya di Android market. Info bar-nya berguna bagi pengguna, misalnya untuk mengetahui aplikasi(app) yang aktif. Browsernya tergolong cepat, termasuk saat membuka website dengan flash. Yang menarik lagi, pengguna bisa membatalkan pembelian apikasi berbayardan mendapatkan kembali uangnya. Syaratnya, pembatalan dilakukan dalam waktu 15 menit sesudah transaksi. App bisa saling berkomunikasidan menggunakan kontak dan jadwal . Hadirnya Sense interface dan sync tools dari HTC semakin memberi kesan positif.Kekurangan : dibandingkan dengan iOS, Android masih kalh intuitif. Pengguna masih membutuhkan waktu untuk menemukan beberapa opsisistem dan third-party file manager. Selain fungsipencarian yang kurang akurat, banyak juga ditemukan aplikasi “sampah” yang kurang berguna. Terakhir tanpa kartu kredit hanya ada aplikasi grratis. Calon pembeli juga perlu berhati-hati karena masih ada beberapa smartphone Android1.6 di pasaran dan tidak menawarkan update resmi dari produsennya.

2. Symbian
Jumlah Aplikasi : 19.625
Store : OVI Store
Kelebihan : dibandingkan versi terdahulu, symbian 3 kini lebih finger friendly dan responsif saat di-input data. Beberapa fasilitas baru yang inovatifdihadirkan nokia pada sistem symbian 3, seperti Web TV, Real multitasking, multiple Homescreen, dan USB OTG (USB On The Go). USB OTG menyediakan fasilitas bgi pengguna smartphone berbasis symbian 3, misalnya Nokia N8 untuk mengakseslangsung file-file yang tersimpan di dallam hard disk eksternal USB , USB Flash Drive(UFD), atau smartphone lainnya(jika di assign sebagi media storage).
Kekurangan : seperti symbian versi terdahulu, pengguna yang sehari-hari menggunakan smartphone ini pasti akan sedikit mengeluhkan navigasi menunya yang kurang praktis dan kadang sulit dipahami (nama menu yang terlalu disingkat). Selain itu, panduan saat bernavigasi di interface-nya pun minim. Memang problem ini hanyaterjadi pada pengguna veteran (lama) symbian. Performa browser dan keyboard layar sentuhnya yang standar juga merupakan salah satu kelemahan lainnya.


3. Windows Phone
Jumlah Aplikasi : 292
Store : Marketplace
Kelebihan : Windows Phone 7 memili interface yang berbeda dibandingkan dengan interface smartphone lainnya. Diferensiasi produk sengaja ditempuh Microsoft agar smartphone mereka berada “diluar” pesaingnya. Interface-nya terdiri atas dua bagian, yaitu sejumlah kotak yang disebut hub dan bagian kedua untuk Tools dan Options. Melalui account Windows Live tersedia layanan mail, contact, calender. Pengguna juga bisa mengakses layanan toko online-nya (Marketplace) dan fasilitas keamanan gratis. Melalui browser dan GPS, pengguna bisa menemukan lokasi, memblokirdan me-reset smartphone.
Kekurangan : Microsoft melakukan perubahan radikal pada sistem baru ini. Misalnya, aplikasi pihak ketiga(third party) tidak boleh aktif dilatar belakang, tidak ada folder, akses file multimedia harus melalui Zune, dan data Office harus disimpan dilayanan online SkyDrive. Memang karena masih baru, semau potensi platform mobile ini belum optimal.


4. iOS
Jumlah Aplikasi : 252.769
App Store : App Store
Kelebihan: iPhone unggul karena penggunaan sistem nya yang mudah dan aplikasi third-party nya yang selalu konsisten dengan Apple. Yang juga positif adalah pengelompokan aplikasi dalam satu folderuntuk kemudahan pengelolaan. Perbaikan besar yang dilakukan Apple adalahmembuat sistem yang mendukung multitasking meskipun masih terbatas. Melalui iTunes, iPhone kini semakin mudah dikelola, misalnyauntuk melakukan sinkronisasi data, backup dan pencarian aplikasi di App Store yang kini masih yang terbesar dan terlengkap.
Kelemahan: meskipun dikenal sebagi smatphone yang user-friendly berkat keunggulan interface-nya, iPhone kurang fleksibeldalam melakukan penyesuaian tertentu bagi pengguna. Pengguna akan mengalami hambatan dalam mengganti aplikasi standar dan mengelola data-datanya di smartphone. Pengguna bahkan tidak dapat seenaknyamemaketkan data-data pada suatu folder. Interkoneksi antar pemgguna iTunes juga merepotkan. Apple sepertinya tidak merancang iPhone untuk melakukan tukar-menukarlagu atau klipvideo dengan sesama pengguna dengan mudah. Hal yang sam juga berlaku saatmeng-copy beberapa file iPhone ke PC


5. Blackberry
Jumlah Aplikasi : 13.869
App Store : BB App World
Kelebihan : Home screen tersaji dalam tiga bagian. Dua bagian atas menyajikan setting mobile phone dan updateberita di layar layar. Pada sisi bawah layarterdapat menu-menu yang dapat dibuka. Menu ini berisi semua aplikasi yang terbagi dalam lima kategori. Setiap icon bisa dengan cepat digunakan dan dikelompokkan pada folder. Sistem Blackberry juga mendukung tranfer data-data multimedia secara mudah melalui WLAN dan PC ke smartphone. Aspek bisnis smartphone RIM ini terlihat pada serangkaian fasilitas keamanan pada sistemnya. Fasilitas enkripsi data dan smartcard untuk kebutuhan seperti e-mail juga tidak ketinggalan.
Kekurangan : Pengguna aplikasi kurang intuitif. Akibatnya beberapa konfigurasi ada yang harus melalui layar sentuh dan lainnya dilakukan melalui tombol menu. Kehadiran trackpad pada Blackberry Torch 9800 semakin mempermudah pengguna dalam “bermanuver ” pada setiap baagian interfacedi layar. Meskipun demikian, beberapa menunyajustru menjadi rumitdan berkesan mubazir. RIM seperti harus terus menyempurnakan mekanisme input antara input di layar dan slider QWERTY keyboard-nya agar lebih selaras.